Friday, January 29, 2010

Depth of Field

In creating your picture, you want to be able to control the focus of your objects.
For instance, when you are taking a portrait, you want to focus of the face of the person and not be distracted by the background. A close up of a flower is nice when the background is blurred, so as not to distract from the detail of the flower.


Taken with aperture f4.5 with a wide angle lens.

When taking a landscape shot you want your background in sharp focus, as in the following picture:


Taken with aperture f10 with a telephoto lens.

The setting you want to focus on is Aperture. When you first learn about aperture, it can be confusing. The smaller the number you choose on your aperture setting the bigger the opening of the lens, and the bigger the number you choose the smaller the opening.
This is the trick I use to remember how to choose aperture setting:
The closer the object is that I want to focus on, the lower the number is that I will choose. The farther away the object is that I want to focus on, the bigger the number is that I will choose.
Practice on your camera using the Aperture priority setting, usually labeled A on the camera. Take picture at various setting and see what you get.
Depending on the kind of lens you have, your aperture may be greater or lesser for the desired effect. We will discuss lenses in another lesson. For now practice in aperture Priority and see what works for your camera.

Saturday, January 16, 2010

Basics: Adjusting Levels/Saturation

Lesson done on a Mac, with Photoshop CS4. Click on samples to get larger view.

For non-destructive editing, hit apple key/j. This will create a layer copy of your original photo. All your editing will be done on the copy. If you edit the original, you will stress the pixels.


1.Crop you photo how you would like it.
2. Adjust the levels.
Click on Image, Adjustments, Levels. Or use the shortcut (apple key/L).


If the levels box needs to be moved, just click on the gray area at the top of the box and drag it where it want it.
The far right and left bars should be brought inside the black area of the histogram. Click and drag the bars where needed. The middle bar will adjust the mid-tones. I dragged it slightly left, to brighten the people in the picture. Click on OK or hit enter.

3. Adjust saturation.
Click on Image, Adjustments, Hue/Saturation. Or use the shortcut (apple Key/U).


I adjusted the saturation slightly to +17. Click on OK or hit Enter.


Now compare the original with the basic adjusted one.

Original:


Final Image:

Thursday, January 14, 2010

Cropping a picture in Photoshop CS4

These lessons are done on a Mac, with Photoshop CS4. To view the lesson samples, in a larger screen, just click on the picture.

1.Open your picture.
If you do not see your tools on the left side of the screen, make sure that the tab in the top right corner is set for Essentials.


2. To crop your photo, click on the crop tool on the left (5th one down from the top).
Click and drag the crop area out. You re-size the box by clicking inside the little squares on the sides of the box and dragging out. You can move the box by placing your
cursor inside the box, right clicking and dragging where you want the crop.


To crop, hit enter or the check mark above the photo area.

Saturday, October 4, 2008

The Apache Trail

My husband and I took the Apache Trail in early October when the temperatures finally dipped down into the 80's. We stopped at various points like Tortilla Flats.

Tortilla Flats is rife with western humor and historic memorabilia. 
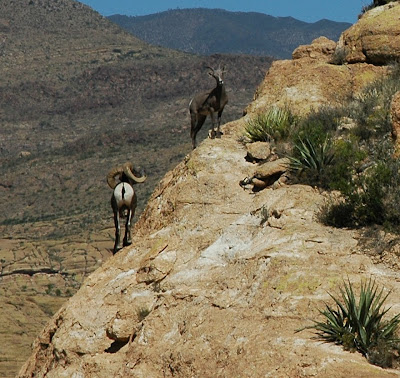
A little one room house holds a tiny museum. If you want something to eat, you can sit in a saddle at the bar or at a table in the restaurant. Their are all kinds of things to look at, inside and out.
The road eventually turns to dirt. It is a well maintained road but shouldn't be driven in bad weather. We saw Big Horn Sheep on the cliffs by the road.


Roosevelt Dam and bridge is a nice stop. The bridge rises an incredible 300 feet above the water.

Tonto National Monument is a great place to visit. Although somewhat isolated, it is worth the trip. Their are a scattering of dwellings hidden in the hillsides of this little canyon. An uphill 1/2 mile hike takes you right up to the Lower Cliff Dwelling.

You can duck through doorways and walk through rooms and little "hallways". The dwelling overlooks Roosevelt Lake. It is a nice place to sit and take in the view and the soft breezes that flow through the canyon. A ranger is always at the dwelling if you have questions too.  

If you want a longer stay and a more strenuous hike, you can take a guided tour to the Upper Cliff Dwellings which takes about 4 hours round trip. Reservations are required and this tour is only open from November to April. 
So for a real western experience, follow the Apache Trail just to the southeast of Phoenix and enjoy.

Follow Rt. 88 to Tortilla Flat and Roosevelt Dam. Head south on 88 to Tonto National Monument and take 60 back to Phoenix. Make it a day trip so that you can enjoy stopping as often as you like.